Pages

Tuesday, July 31, 2012

Beef Pot Pie

Last week, after going back and forth on how to use some leftover Spicy Shredded Beef, I decided to make my first Beef Pot Pie.  Some of you may remember that I made my first Chicken Pot Pie last winter.  Just like then, I asked for advice from my dear friend Lisa (from Extraordinary Life).

Her suggestion?  Follow the same basic recipe that I used for Chicken Pot Pie, but trade out the chicken and chicken broth for the shredded beef and beef broth.  The result?  Mmmmmm!

I already LOVE the Spicy Shredded Beef recipe from Cutting Back Kitchen!  In fact, we enjoyed it twice this summer already!  Now, I'm looking forward to preparing it again so that I can make this pot pie with the leftovers again!  I'll be keeping a look out for a sale on roasts!


Beef Pot Pie

Ingredients: 

  • 2 large potatoes, diced
  • 1 large stalk celery, diced
  • 1 small onion, diced
  • 1/3 c. butter
  • 1/4 c. flour
  • 2 c. beef broth
  • 1 c. milk
  • 1 tsp. salt
  • 1/2 tsp. pepper
  • 2 c. frozen mixed vegetables, thawed
  • 1.5 - 2 c. pre-cooked shredded beef
  • pie crust (I doubled this recipe)
Directions: 
  • Preheat oven to 400 degrees. 
  • Cook potatoes, onions and celery in a large pot of water, until potatoes are tender.  Drain, set aside. 
  • Melt butter in the same pot used to cook the potatoes, onions and celery.  Add flour, milk and broth, stirring constantly until thick and bubbly.  
  • Stir in salt, pepper, shredded beef and vegetables.
  • Cook until heated through.  
  • Pour into a 2 quart casserole dish.
  • Top with pie crust.  Cut slits in the pastry to allow steam to escape.  
  • Bake in oven for 20-25 minutes or until crust is golden brown and filling is thick and bubbly.  

Mmmm!  So good!  

Sure, this definitely isn't a traditional summer meal, but it was a great way to stretch that leftover shredded beef!  I love frugal meals like this one and now after this tease, I'm really starting to crave soups, stews and pot pies!  Can't wait to make this again!  

Are you interested in joining me in a Decluttering Challenge?  Follow the link to learn more!  


Tuesday, July 24, 2012

500 Item Decluttering Challenge


I know, it's Tuesday and I normally have a recipe to share on Tuesdays, but as I mentioned yesterday, I haven't been cooking too much the past couple of weeks.  Instead, I've been working on getting rid of some clutter from around the house.

You may remember that I challenged myself to remove 500 items from my home this past Spring.  While I failed to follow up on the blog for the final 2 weeks of my challenge, I was successful in the challenge itself!
At the end of the month, I managed to sell, donate or throw away more than 500 items!  That's what really matters, right?

I wish I could say that after those 500 items were gone from the house, that this place was spotless and immaculate (with the occasional goldfish cracker between the sofa cushions and fruit snack on the floor) but sadly, it's still looking like the makings of a Hoarder's episode in my basement.

With Grace now being the perfect age for arts and crafts, I need to toddler proof our basement so we can crack out the finger paints, markers, glitter...all of that messy stuff I don't want in my living room or kitchen!  Currently, we do that stuff outside, but when the weather turns cold we'll need to do that stuff inside.

In addition to an arts and crafts station for Grace, I need to clear out some space for me to "work".  When we first moved into this house, Joe set up a wonderful craft area for me downstairs.  And, for about a year, I really enjoyed working in that space.  When I was pregnant with Grace, I had really bad morning sickness that prevented me from venturing too far from the bathroom.  By the time the morning sickness was over, there were other issues that prevented me from spending much time on my feet.  Fast forward to now, my craft area is filled with stuff I just don't know what to do with.  Stuff that should be packed away in the attic, sold on ebay, or just needs to be thrown away.  That is my goal now.

By the end of August, I'd like to have another 500+ items removed from the house!  I'll keep y'all posted on my progress each week...on Tuesdays.  My goal is 100 items per week.  If y'all want to join in, I can set up a linky and we can all share photos of our 100 items before they leave the house!  Let me know!


Monday, July 23, 2012

Menu Plan Monday 2012 ~ Week of July 23rd


I can't believe I skipped menu planning last week.  I was absorbed in de-cluttering the house and never got around to working on my menu plan.  Even this week, I'm later than usual in working on my plan.

I have a few projects that I want to work on as soon as the weather gets a little cooler.  In order to do that, I need to find my craft table under the piles and piles of junk that keep finding their way to my craft space!  Joe keeps reminding me that the junk didn't get there by itself, which I do realize.  Just too often, I have a box or basket of items I just don't know what to do with so I quickly drop it onto my craft table to be dealt with later.  Later is now!  And all that stuff I don't know what to do with is either going into a yard sale pile or being donated.  That will be my focus for the next couple of weeks!

Dinners will have to be simple for the next couple of weeks.  Leftovers, crock pot meals, pre-cooked meals from the freezer will be on the table at meal times until I get myself organized!


  • Bacon, Potato & Egg Skillet.  I diced up some leftover grilled potatoes especially for this meal.  Since we're all out of bacon, I'll dice up some ham to add to this easy breakfast-for-dinner meal!  

  • Spaghetti with Crock Pot Tomato Sauce, Fried Zucchini.  We picked 2 zucchini from the garden over the weekend and another will be ready any day now!  I've got to start using it up!  

  • Spaghetti Squash Casserole.  It's been a while since we've had this meatless meal, so when I saw a bin of spaghetti squash at the grocery store the other day, I just couldn't resist adding one to my cart!  
Fried Zucchini

  • Beef Pot Pie or Beef Vegetable Soup.  Last week, I made Spicy Shredded Beef in the crock pot for the second time.  The first time we made it, it didn't shred and we enjoyed thin slices on club rolls with some horseradish sauce.  Mmm!  This time, I was able to shred the roast and after 3 meals, we still had a little bit left, so I popped it into the freezer.  I figure I'll just add some veggies and a little gravy or broth and make either a pot pie or a soup.  So, we're seeing 4+ meals from one small roast!  

  • Leftovers and sandwiches (or maybe burgers) will round out the rest of the week for us!  


Now that you know what we're eating this week, let us know in the comments what's for dinner at your house this week!  Or, if you need more menu planning inspiration? Follow me over to  Menu Plan Monday hosted by I'm an Organizing Junkie! Or, if you like what you see here, you can check out my past menu plans.


You can also find this week's menu plan linked to On the Menu Monday hosted by Yvonne at Stone Gable.

Don't forget to enter our current giveaways!  Links can be found at the announcement below our header!


GroopDealz Giveaway

Good morning, friends!

I know, I know!  I'm a bit too cheerful for a Monday morning, huh?  Don't let my greeting fool you, after a wonderful weekend I'm suffering from some Monday Morning Blues myself!

What better way to chase those blues away than with a giveaway?!  Yep!  We're hosting another giveaway! This one has a shorter running time than the other two we have posted (follow the links at the top of this post to enter our other two giveaways) but that's okay...it's super easy to enter with the rafflecopter form!  (This is my first time using this type of form for giveaways!)

First, let me tell you about the prize!


GroopDealz, a daily deal site that features wonderful boutique items at a much more affordable price, is offering this beautiful Bubble Bib Necklace (shown below) at an awesomely low price!  They are also allowing me to give one away to one lucky reader!  The winner can choose one of the 12 fabulous color options for their prize!


So pretty and such fun colors!  The green and the navy are my favorites!


To enter, use the rafflecopter form below.  Enter your email address to "register" with rafflecopter (so we can contact you if you win!) then follow the steps to enter!

a Rafflecopter giveaway

Winner will be notified via email and will have 48 hours to reply in order to claim their prize otherwise a new winner will be selected.


Disclaimer:

  • This giveaway has been sponsored by GroopDealz, although I have been monetarily compensated for sharing this giveaway, all opinions are honest and my own.  


Saturday, July 21, 2012

I'm the Weekend Company over at Everyday Mom's Meals

Today was a busy day, but I wanted to quick drop in to ask you all to stop by and visit Krista over at Everyday Mom's Meals!  She's got a wonderful blog filled with everyday recipes!

I had the chance to be her "weekend company" on her blog and I shared one of my favorite everyday meals with her readers!  Be sure to stop in and say HI!


Thursday, July 19, 2012

Freezing Bananas in Ice Cube Trays

With a picky toddler in the house, we try to keep foods that Grace likes on hand at all times.  This means we're always stocked up on french fries, chicken nuggets, rotisserie chicken, corn, peas, mandarin oranges, yogurt, dry cereal, and bananas.  While there's a long shelf life on most of the foods, we just can't seem to keep up with the bananas.  Even with the 3 of us eating them, they just seem to turn too quickly.  


Since I hate being wasteful, I've been freezing the bananas once they start to get too spotty, rather then just tossing them into the garbage.  


I used to just peel, slice and place the bananas in a zipper freezer bag and pop them into the freezer.  But a lot of times they would freeze together.  


A better way to freeze them would be to place the sliced bananas on a cookie sheet in a single layer, then to place the cookie tray into the freezer.  Once the banana slices are frozen, they can be placed into a zipper bag and stored into the freezer.  This method helps to keep the bananas from sticking together.   I just never have enough room in my freezer for the cookie sheet.  


I found that mashing the bananas then spooning them into ice cube trays works best for me.  The ice cube trays take up less space than the cookie tray method.  


Normally, I only need to use one ice tray and I fill those ice cube sections pretty full.  Almost overflowing.  If I need to fill an additional tray, I make sure to fill the sections in the bottom tray less full.  That way the top tray won't sit IN the mashed banana cubes.  


Once they are frozen solid, they can be easily removed from the trays and placed into a freezer bag or freezer-safe container.  


Frozen banana cubes are perfect for smoothies.  Three cubes along with some berries make the best low-calorie smoothies!  


Tuesday, July 17, 2012

Don't forget to enter our Summer Giveaways!

Did you know that we're hosting 2 food-related giveaways this month?  If you're a foodie like me, you're going to want to enter for your chance to win!  It's easy to enter...just follow the links below to find out how!


First we have our Aurora Natural Original Salad Fixin's giveaway!  I'm super-excited about this giveaway since it's one of my all-time favorite products!

Follow the link to be directed to the giveaway page for these awesome salad toppings!


Also, we are running another giveaway for Butch's Smack Your Lips BBQ Sauce and Dry Rub.  Our family loves BBQ sauce and Butch's products are at the top of our list of favorites!  


Follow this link to find out how you an enter to win a bottle of sauce and jar of dry rub (your choice of flavors)!  


Burger Four Bean Bake ~ Crock Pot Recipe

This is one of my favorite pot-luck/family get-together meals.  My aunt always brings this to family cook-outs and I always eat a couple of servings thoughout the day!  It reminds me of our favorite baked bean recipe but is a complete meal with the added ground beef and green beans!

While this is my aunt's specialty, I've also made this a few times as my contribution to cook-outs with friends.  It's always a hit with baked bean lovers.

I planned to make this overnight in the crock pot so we could take it to a friend that is recovering from surgery.  I knew the basic ingredients, but wasn't sure of the exact measurements.  When I looked for my copy of the recipe, I couldn't find it.  I think we may have misplaced it when we moved a few years back.  Rather than call my aunt after 11pm, I decided to search online for a similar recipe!  Wow!  There are so many different variations!  This one seemed to be the closest to what I remembered, and I made a few changes to make it more like my aunt's recipe.

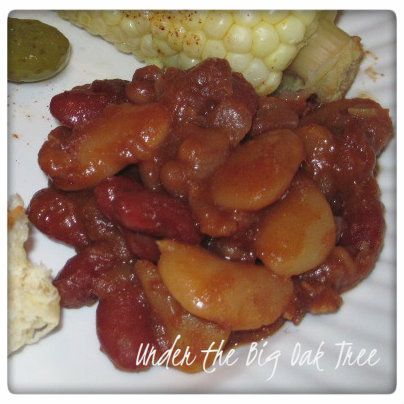
Of course, I forgot to take a picture of the completed dish.  So, here's a photo of our favorite baked beans....just imagine the added ground beef and green beans!


Crock Pot Burger Four Bean Bake
     *Adapted from Calico Beans Recipe

Ingredients: 

  • 3/4 lb. pre-cooked ground beef
  • 1/2 lb. bacon, cooked and crumbled
  • 1/4 cup onion, finely chopped
  • 28 oz. can pork 'n' beans
  • 16 oz can kidney beans, drained and rinsed
  • can butter beans, drained and rinsed 
  • 2 cups frozen cut green beans 
  • 1 tsp. finely ground mustard
  • 3/4 cup firmly packed brown sugar
  • 1/2 cup ketchup
  • 2 tsp. apple cider vinegar 
Directions: 
  • Add all ingredients to crock pot, stirring to mix well. 
  • Cover and cook on low for 8 hours.  
Notes:  
  • I used some pre-cooked ground beef from my freezer.  A month ago, I browned up 3 or 4 lbs. of ground beef with some added vegetables (onion, red bell peppers, celery and carrots).  Since I knew I was going to throw this together before bed, I decided it was a good idea to save myself some time. I took it out of the freezer earlier in the day and let it thaw partially before adding it to the bean mixture.  


Sunday, July 15, 2012

Celebrate National Ice Cream Month with an Ice Cream Party

July is National Ice Cream Month!  In fact, today is National Ice Cream Day!  What better time to finally tell you about the Ice Cream Parlor Birthday Party we threw for Grace's 2nd Birthday.  Yes, I know, I already  told you about the Sesame Street Party we had for her 3rd birthday!  Somehow, until now, I lacked the motivation to tell you about this perfectly delicious party.

Throwing an ice cream party was actually Joe's idea.  While we were putting the finishing touches on the Sweet Shop we put together for Grace's first birthday, he commented on how fun the same concept would be with ice cream.  I love love love ice cream, so I was totally on board with the idea!

Then, for Christmas that year, my parents made us a fabulous gift basket with all sorts of goodies and the cutest ice cream dishes tucked inside.  They didn't know of our plans of throwing an ice cream bash, but knew how much I love little dishes...and of course, polka dots!  I love love love polka dots!  Almost as much as ice cream!


In addition to the colorful, ceramic dishes from my parents, I picked up some clear glass milkshake glasses, sundae dishes and banana split boats.  I lucked out finding them on sale at the craft store.

I didn't go crazy with decorations for this party since I really wanted to focus on having a variety of sundae toppings for our guests.  I did want to make a backdrop for our sundae buffet, but had a difficult time finding a striped fabric that I liked.  As time was running out, I found a set of pink and white tab-top curtains (on ebay) that worked perfectly!


My absolute favorite detail of the party was the invitation.  For Grace's 1st and 3rd birthdays, I made the invitations (you can see them here and here), but I ran out of time in planning her 2nd birthday and needed to purchase invitations.  I knew just where to look, too!  Bear River Photo Greetings is an Etsy Shop that I've been using for a few years.  I told my friend Angie what I was looking for and she came up with the most adorably perfect invitations for Grace's party!  (For privacy's sake, I "erased" our personal information on the invitation.) All I had to do was upload the file to and send to our local photo printer (CVS, Walmart, etc.) and have them printed super-quick using the one-hour option!  Adorable and convenient, too!  Ordering these invitations* saved me a lot of time and aggravation!

While this particular design isn't available for sale (Angie made these for me as a favor), Angie has a variety of other invitations, birth announcements, adoption announcements, greeting cards, etc. in her shop.  (I order my Christmas cards from her shop every year!)  So check out Bear River Photo Greetings if you are in need of something fabulous to announce your next event!  (Currently, Bear River Photo Greetings is closed for vacation, but will be open and running again next week!)  


With the invitations sent out, all I had to do was gather the assortment of toppings needed for our sundae buffet.  On the day of the party, I covered a narrow table with a vinyl table cloth and then set out our toppings:  chocolate sprinkles (jimmies in my neck of the woods), rainbow sprinkles, shredded coconut, mini marshmallows, candy coated chocolate pieces, maraschino cherries and whipped cream.  Plus a variety of sauces:  hot fudge, caramel, strawberry syrup and chocolate sauce.


We even had bananas in case anyone wanted to make banana splits and brownies for brown derby sundaes (my favorite)!  Root beer, orange and cream sodas were available for floats as well as cones for something a little more traditional!

After our guests enjoyed lunch, we set out all the tubs of ice cream on the dining room table.  Though I didn't get a photo, we offered a variety of different flavors so there was something for everyone!


Since I love cupcakes just as much as polka dots and ice cream, my niece made some yummy ice cream cone cupcakes complete with sprinkles and a cherry (licorice) on top!


We offered our guests bottles of water to wash down all of that sugar and even those matched our theme thanks to Angie!  In addition to making the invitations, she also designed matching labels for us to attach to our bottles!  (You can find bottle labels and favor tags in her shop, too!)

Believe it or not, Grace doesn't eat ice cream, but she sure did enjoy picking the sprinkles off the tops of those cupcakes.  And even though she didn't have any ice cream that day, she had a wonderful day with family and friends.  Here's the proof:


Even her pajamas matched the party (thanks to Grace's Aunt Barb)!  I sure do love a party with a theme!

So, how are you celebrating National Ice Cream Month??  What's your favorite ice cream flavor?


*Note:  The invitations in this post are not available for sale by Bear River Photo Greetings.  These were made for me at no charge as a favor from a friend.  Bear River Photo Greetings offers a wide range of other great designs for a variety of different occasions!

I've linked this post to the following blog carnivals and linky parties:


Tip Junkie handmade projects


Saturday, July 14, 2012

Crock Pot Cooking Overnight

Lately, I've been getting a lot of use out of my crock pot.  While most crock pot recipes have alternate cooking times for cooking either on high or low, I prefer to cook our crock pot meals on the lower setting.  But, I often have a difficult time getting our dinner into the crock pot early enough in the day to accommodate   the lower, slower cooking time.

Most recipes can also be assembled in the crock the night before, then placed in the fridge.  The next day, insert the crock into the heating element.  But, that also brings up another issue for me:  I never have room in the fridge for the filled crock.

A few weeks ago, I was trying to get a some meals prepared a few days in advance.  I decided to put my crock pot to work at night while we slept.  All I did was throw the ingredients into the crock pot, set the temperature (to low) and the timer before I went to bed for the night.  This works perfectly for me since I'm a night owl.

Our slow cooker will default to the keep warm setting once the timer is done.  That's usually just before the time Joe leaves for work.  I usually leave him a note asking him to check on the meal, give it a stir and turn it off.  That way it's cooled down by the time I get up and I can then put it into a new container for either the fridge or the freezer.

This has worked really well for us, especially since I've been preparing some bigger meals to take to our family's house.  Knowing that the meal is in the fridge, already prepared for whenever we are ready to leave saves me from stressing out while trying to make sure everything is ready to go at a specific time.  Sure, I have to reheat dinner when we get there, but for me that's just so much easier.


Friday, July 13, 2012

Supporting our Local Schools ~ Country Fair

Several weeks ago, we took Grace to a Chicken BBQ and Country Fair that was being held in our town.  It's a small, annual event that is hosted by a local school.  We've taken Grace for the past 3 years.  

Grace is too young for a lot of the activities, so we're never there for more than an hour or so, but we don't mind it for a quick outing.

We usually grab something to eat while we're there and then go to their take-out area to pick up some BBQ Chicken to take home for an easy dinner.  We also take home one of the delicious strawberry pies that the event is known for!  Mmmm!

Last year, Grace rode the pony cart and loved it!  We weren't sure how she would like it, so I rode with her (poor pony!) but we won't be seeing those photos today!  


This year, Grace rode with one of the girls that was running the pony cart rides and thought it was great!  She really enjoyed being a big girl!


The hot air balloon was also part of the fair's attractions, but since Grace is afraid of heights, we opted to skip it.  She did think it was neat to see the big balloon up so close though!


This is one of the more expensive community events we've attended this summer since we purchased tickets for the pony cart and some of the other activities in addition to the take-out chicken and pie.  But since the proceeds go right back to the school, we don't mind at all!


Wednesday, July 11, 2012

Gardening Journal ~ Planting the Seeds

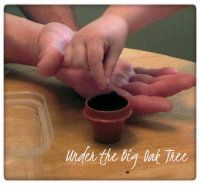
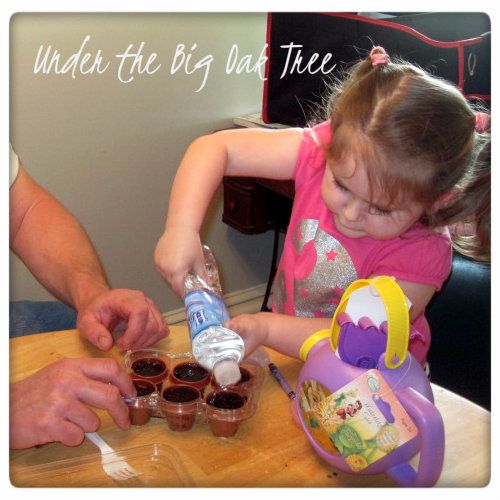
One morning several weeks ago, I woke up to find Joe helping Grace plant vegetable seeds in the little seed starter greenhouse kit we picked up at the hardware store.  Before I could even see straight, I grabbed my camera and snapped a few photos.


After a few seeds were planted and watered, Grace lost interest and I took over and finished.  (We had a much bigger green house kit, than the one shown in the photos, that needed to be filled with seeds.)


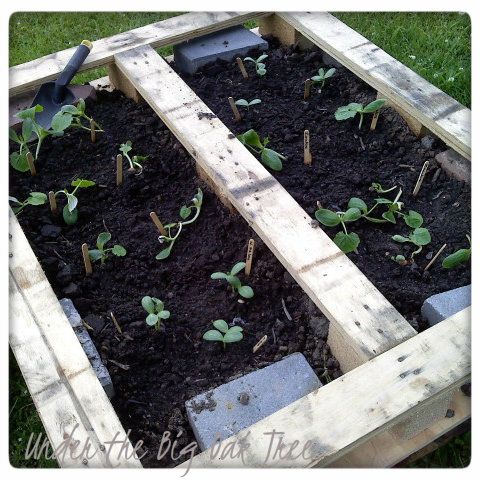
In just a week, the zucchini, summer squash and watermelon plants were too big to keep in the starter kit.  Since our garden beds weren't built yet, I decided to create my own little holding area for the growing plants to spread out a bit, until Joe had a chance to build the other beds.


Joe helped me stack 2 pallets on top of each other since they were too heavy for me to move on my own.  I placed bricks (left here from the previous owner) around the outside edges to help keep the dirt from washing away during watering or rain.  Then I added some soil and, of course, my little plants.

This worked out great.  At least I think it did!  The plants are now in their permanent bed and have just started to produce and they are full and healthy looking, so I don't think there was a problem with their temporary home!


Tuesday, July 10, 2012

Bacon, Potato, & Egg Skillet

When I was a kid I really hated breakfast.  Mostly, it was eggs that I disliked.  Especially, when my dad added cheese to the omelets.  Oh!  The smell!  The combination of the cooked eggs and the melted sharp cheddar cheese...the smell alone had me feeling queasy for hours!

Dad would make me some plain scrambled eggs and I would have to drown them in ketchup to cover the taste!

In my early teens, I would hear my dad getting breakfast ready while listening to Breakfast with the Beatles.  I started to pretend to sleep-in on those mornings, hoping he would forget to make something for me.  Sometimes it worked, sometimes it didn't.

The only time I enjoyed breakfast as a kid is when my dad would cook bacon, fried potatoes and scrambled eggs all mixed together.  The bacon and potato flavors were strong enough to mask the flavor of those dreaded eggs!  If only my dad could have made that every weekend, it would have saved us some ketchup! Not to mention, I could have spent less time hiding in my room on Sunday mornings.

Over the years, I've made this several times.  Canned, sliced potatoes work great, but I find it's easier to use leftover Grilled Potatoes to make this dish!

One morning, I found myself with a half pound of pre-cooked bacon and leftover Grilled Potatoes in the fridge and knew right away that I was going to make this one-frying pan breakfast!


Bacon, Potato, & Egg Skillet 


Ingredients:  

  • 1/2 lb. bacon, pre-cooked and chopped
  • 1-2 leftover Grilled Potatoes, quartered 
  • 6 eggs
  • splash of water 
  • 1-2 tsp. bacon grease 
  • Salt & Pepper to taste
Directions: 
  • Heat bacon grease in a large frying pan or cast iron skillet. 
  • Add in the potatoes in a single layer, stirring occasionally.  
  • Cook potatoes to desired crisp-ness
  • Add in the pre-cooked bacon
  • Season with salt and pepper.  
  • Crack 6 eggs into a bowl and scramble with a fork.  
  • Add a splash of water and mix well. 
  • Pour eggs over potato/bacon mixture, stirring and scraping eggs from sides until eggs are cooked through.  
Notes: 
  • Canned potatoes work too, but take a bit longer to fry.  
  • If you don't have pre-cooked bacon, cook your bacon first.  Drain the grease, leaving a small amount in the pan to use for frying the potatoes.  
  • This can also be made in more of an omelet form than a scrambled dish.  My dad sometimes makes it that way, I just never have any luck with that method.  
  • This is great topped with ketchup, barbecue sauce or even some Tabasco Sauce!  
  • This works well as a breakfast burrito filling, too!  


Monday, July 9, 2012

Butch's Smack Your Lips BBQ Giveaway ~ July 2012

Summer is in full swing and so is grilling season!  With the heat wave so many of us are experiencing the past few weeks, cooking outdoors makes the most sense!  Why heat up the kitchen when you can throw some chicken or burgers on the grill for a quick meal?!

My favorite summer condiment is barbecue sauce.  I use it on almost everything!  Chicken, pork chops, burgers, steaks, fish.  I even use it in place of ketchup on my fries or grilled potatoes!


Butch's Smack Your Lips BBQ Sauce is the brand I like to have in my pantry at all times along with Butch's Magic Dust Dry Rub (which, by the way, is awesome on fries!!!).

For no other reason than it's summer, Butch's Smack Your Lips BBQ is allowing me to share their great products with one lucky winner!


Prize Information:  

  • One lucky reader will receive a bottle of Butch's Smack Your Lips BBQ Sauce and a jar of dry rub in the flavors of their choice!  

Entry Information:  

Six ways to enter!  You may complete one or all of the tasks below to enter!  
  • Visit Butch's Smack Your Lips BBQ and tell me (in a comment on this post) which flavor BBQ Sauce and dry rub you would like to win.  
  • LIKE Under the Big Oak Tree on Facebook (there may be ways to earn additional entries posted there throughout the length of the giveaway).  Leave a comment here letting me know you did.  
  • Leave a comment letting us know your favorite way to use barbecue sauce.  

Giveaway Rules & Reminders:  
  • This giveaway ends Tuesday, July 31st at 10:00pm, EST.
  • Giveaway open to residents of the US and Canada only. 
  • Your comments are your entries into this giveaway.  Please remember to leave a separate comment for each completed task.  
  • One winner will be chosen via random.org and will then be contacted via email.  Winner will have 48 hours to claim their prize or another winner will be chosen.  
  • Please provide your email address so that I may contact you should you win.  


Disclosure: 
  • I was not financially compensated for this review.  The sponsor provided me with a non-returnable prize pack including samples of the product mentioned in this review.  The sponsor is also providing the same prize pack for the lucky winner of this giveaway.  All opinions and thoughts mentioned in this post are honest and my own.


Sunday, July 8, 2012

Aurora Natural Salad Fixin's Review and Giveaway

If you're a regular here, then you probably already know that I am trying to lose weight.  It's been an on again, off again struggle for the past several years.  But that's not really the point of today's post, except to say that I've been eating A LOT of salads.  Big salads for lunch.  Smaller salads to accompany our main course at dinner time.  Some nights salad IS the main course!

The main reason all of these salads, day in and day out, haven't gotten boring for me is because of the toppings.  Later in the week, I will show you my favorite salad!  Mmmm!


I was first introduced to Aurora Natural Salad Fixin's at a family barbecue a couple of years ago.  In addition to the traditional barbecue foods, my mother-in-law also made a big salad with a bowl of Salad Fixin's on the side.  I went back for seconds just so I could enjoy the crunchy mixture of toppings!  I had never seen anything like this in the salad dressing aisle at the supermarket before, so I assumed she put the mixture together herself.  When I asked her about it, she showed me the bag and told me she picked it up at her local bulk warehouse market.

It took me a while to pick it up since we didn't have a membership to that particular warehouse store.  But finally, a few months ago, while shopping with a friend, I picked up a bag and was hooked!  No more boring salads!

I found myself  looking forward to the Salad Fixin's so much that I started to eat salads twice a day just as an excuse to enjoy the yummy toppings!

As I noticed I was starting to get low on my bag of fixin's, I started using smaller portions to make it last since I didn't know when I was going get a chance to pick up another bag.  Stupidly, it never occurred to me to check and see if the company had a website or online store.  I was pleased to discover that they do and I'll be placing an order in the very near future!

I was also pleased to discover a very large line of all natural and organic products.  In addition to the Salad Fixin's shown above, Aurora Naturals also packages dried fruits, nuts, trail mixes and granolas.  These items are all natural.  No preservatives.  No artificial colors.  No additives.  Great, right?!  Check out their About Us page on their website to learn more about this fabulous company.

It's been a long time since I've been this excited about a food product.  Seriously, I love food...I didn't get to be this fat without loving food...but it's been a really long time since I've tried a product and LOVED it as much as I love the Aurora Natural Original Salad Fixin's!  It's by far, my favorite thing to add to a salad and it tastes great on it's own, too!  While checking out the Aurora Natural facebook page, I read that one fan munches on Salad Fixin's instead of popcorn while at the movies!  Now that's a great idea!

Recently, I was very excited to receive a gift package of Original Salad Fixin's and a couple other goodies from the nice people at Aurora Natural.  I'm even more excited to be able to give one away to one lucky Under the Big Oak Tree reader!


Want to know what you could win?  
Your gift package (should you win) will contain the following:
  • One 22 oz. resealable bag of Original Salad Fixin's. 
  • One 14 oz. plastic tub of Original Salad Fixin's (great to keep in your desk at work).  
  • One Aurora Natural reusable tote bag. 
  • One Aurora Natural travel mug.  

Here's how you enter for your chance to win:  
  • Visit the Aurora Natural website and leave a comment here on this post about something you learned about the company and/or their products (something different than what was mentioned in this post) or let me know which of their products interest you.  
  • LIKE Aurora Natural on Facebook (let them know that Under the Big Oak Tree sent you) and leave a comment here on this post letting me know you did.  
  • FOLLOW Aurora Natural on Twitter (let them know that @thebigoaktree sent you) and leave a comment here on this post letting me know you did.  
  • Enter our Butch's Lip Smacking BBQ giveaway and leave a comment here on this post letting me know you did.  
  • LIKE Under the Big Oak Tree on facebook (there may be ways to earn additional entries posted there throughout the length of the giveaway) be sure to leave a comment here on this post letting me know you did.  


Giveaway Rules & Reminders:
  • This giveaway ends Tuesday, July 31st at 10:00pm, EST.
  • Giveaway open to US residents only. 
  • Your comments are your entries into this giveaway.  Please remember to leave a separate comment AFTER completing each task.  
  • One winner will be chosen via random.org and will then be contacted via email.  Winner will have 48 hours to claim their prize or another winner will be chosen.  
  • Please provide your email address so that I may contact you should you win.  

Disclosure: 
  • I was not financially compensated for this review.  The sponsor provided me with a non-returnable prize pack including samples of the product mentioned in this review.  The sponsor is also providing the same prize pack for the lucky winner of this giveaway.  All opinions and thoughts mentioned in this post are honest and my own.